Hair Patch Test 101 – How to Avoid Allergic Reactions to Products
Updated on
This post may contain affiliate links. As an Amazon Associate, we may earn from qualifying purchases.
If you’re always skipping the patch test, you could be one product away from a fatal allergic reaction!
Case in point:
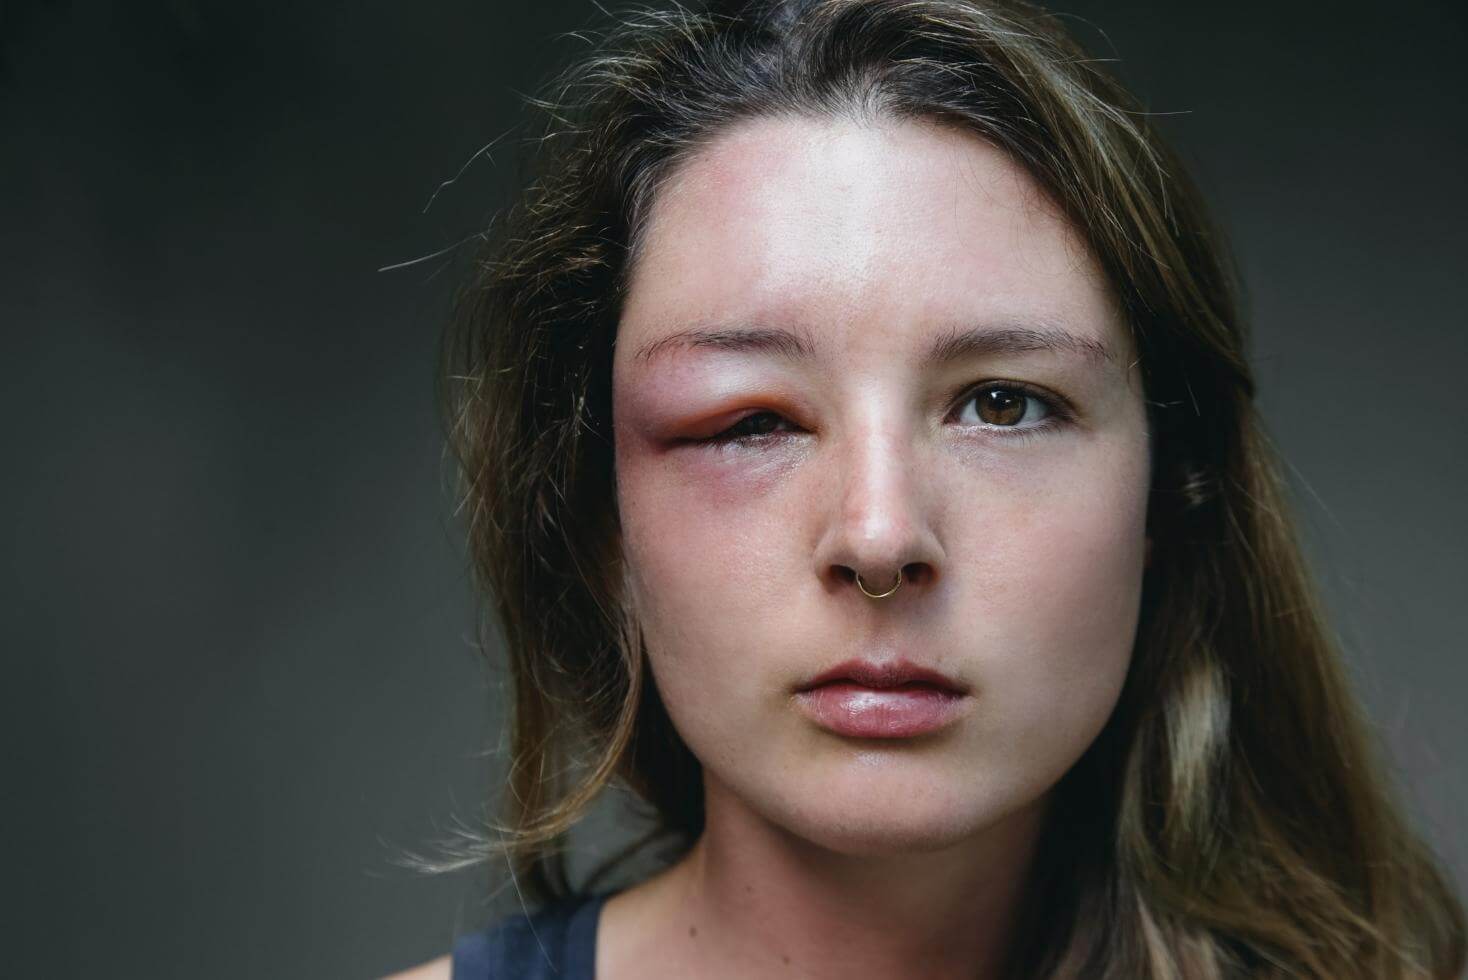
A woman who was trying to cover up her gray hair with a £5 Schwarzkopf box dye was horrified to see her face swell up to twice its size. (DailyMail)
In a separate incident, a TV producer’s severe allergic reaction to eyebrow dye left her with big, swollen, “bug eyes”. This happened because her beautician failed to do a patch test beforehand. (Read it here)
While the consequences of these 2 incidents may be extreme, they serve as a reminder that it’s always critical to perform a patch test for hair and skin products before using them, even if it’s just a small amount on an inconspicuous part of your body.
If you haven’t done a patch test before, read and bookmark this article.
I’ll explain everything you need to know about patch tests and how to do them at home correctly.
Table of Contents
What Is a Patch Test?

A patch test determines whether you are allergic to a new product before using it on a larger area of your skin or hair.
It involves dabbing a small amount of the product to a small area of the skin, usually on your forearm or behind your ear, and waiting 48 hours to see if there is any adverse reaction.
To do a patch test, you can follow some quick and easy steps to ensure product safety.
You’ll need a cotton bud, a couple of minutes of your time, and the hair product you intend to use. What’s even more convenient – you can do it at home.
So here’s a quick way to patch test your hair product:
- Apply a slight amount of the product (the coloring cream and the activator) to the skin;
- Wait 48 hours;
- Scan for reactions.
- If there are none, you are free to proceed with coloring or any other product.
If your skin reacts badly (showing signs of redness and itching) within 48 hours, you should not proceed with using the hair product.
Risks Associated With Not Doing a Patch Test
Hair color products might not sit well with every client, and that is OK.
As professionals, we must ensure we have taken precautions for a safe coloring session. Sometimes, we do get the occasional client who refuses to do a hair dye patch test first, and we have to explain the severity of chemicals in hair dyes and offer advice on the best way to test for a possible reaction.
The risks associated with going straight to the treatment without patch testing may include allergy breakouts as the most severe indicators. Moreover, the following side effects might also occur:
- Mild swelling of the test area
- Swelling of the eyes, hands, feet, and lips
- Burning
- Flaking of the skin
- Anaphylactic shock
- Lightheadedness or dizziness
- Skin irritations and rashes
- Flushed skin
- Wheezing
- Swelling of the tongue
- Nausea
- Vomiting
- Stomachache
- Severe itching, and so on.
Of all the risks we mentioned, falling into an anaphylactic shock due to an allergic reaction to a hair product is a pretty rare but very serious risk. Itchiness is the most common risk from using hair treatments that don’t sit well with the client.
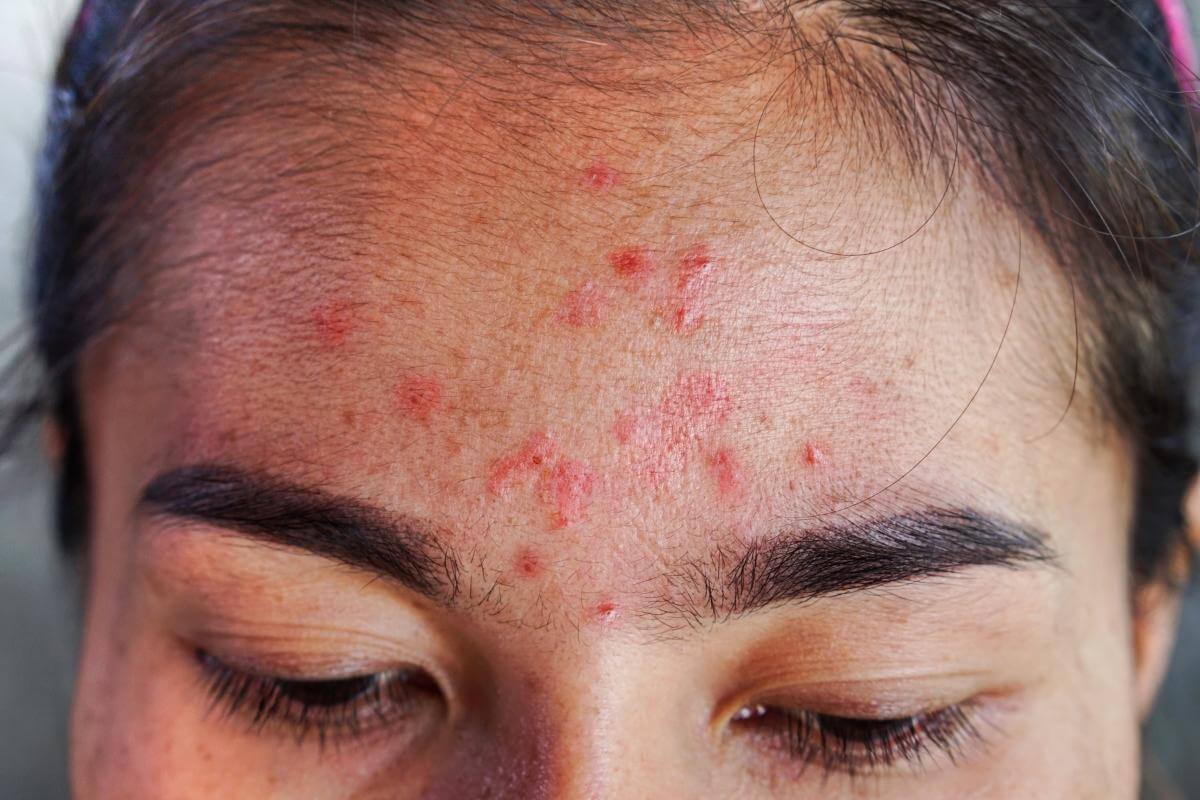
Symptoms of Allergic Reactions to Products
If you’ve just finished your hair dye patch test and have waited for the 48 hours to pass, it’s time to inspect the treated area and see if the hair dye has left some marks on your skin.
Itchy Skin
If you experience itchiness, it is a clear sign that the hair product isn’t compatible. Itchiness means your natural pH levels are being thrown off, and your skin is more susceptible to damage. Given the fact that a hair dye contains chemical components that deliver permanent hair color, you are highly advised to avoid using the product so as not to experience more side effects.
Flaking
If your skin starts to flake, it’s clear that the level of hydration is off – meaning the product you have tested dries out your skin. The epidermis is sensitive enough, so if the hair dye treatment causes more dryness to the test area, you can be certain it will cover your scalp in flakes that will be hard to get rid of.
How to Deal With Allergic Responses?
First things first- don’t panic!
Not everything is lost if you’ve done a patch test and discovered that you have an adverse reaction. What’s important is that you’ve discovered what doesn’t suit you so you can steer clear of those products in the future.
If you’ve suffered an allergic reaction to a hair treatment, try doing the following:
- Thoroughly wash your hair and scalp using a mild shampoo;
- Apply an emollient gently (an emollient is a moisturizing treatment), like a water-based cream or petroleum jelly, on the affected area;
- In case you don’t feel relief, consult with a medical professional.
Hair Dye Patch Tests
Besides PPD (Paraphenylenediamine), hair dye contains yet another allergy-triggering ingredient – Ammonia. Allergies caused by them are more frequent than many of us think, which is why many women that use a hair dye will experience an itching sensation on their scalp while dyeing their hair.
Recently, keratin hair treatments have been creating a lot of buzz among women (and men) of all ages. Keratin treatments leave your hair frizz-free and reduce breakage. Even though you might want to be part of the keratin craze, ensure you only do the treatment at a professional salon. A well-educated cosmetician will know that doing a keratin patch test first is essential.
Why should you do a keratin patch test if the treatment is beneficial for your hair?
Well, you won’t be wrong to ask. Some keratin treatments may contain an ingredient called Formaldehyde, which is a known allergy trigger. If you are keen on trying the keratin treatment, read all the information about the procedure and avoid Formaldehyde-based products at any cost.
How to Do a Hair Patch Test?
Patch tests are rather easy to do. All you need is a cotton swab that you’ll use to apply the product to your skin. In general, there are several sensitivity points on your body, with the neck being one of those.
However, a couple of ways are most convenient for patch testing – behind-the-ear and elbow tests.
Let’s explain both methods in more detail.
Behind the Ears Hair Dye Patch Test

Doing a patch test on the skin behind your ear is probably the most common way of performing the test. Being a straightforward method for testing allergic reactions from hair treatments, this patch test will only take a second.
- Dab a small amount of product behind your ear
- Use cotton swabs or a facial cotton pad to dab the tip into the product and apply a tiny amount of the hair product you plan to use. Using the tip of the swab or the pad, apply the product to the small area of your skin behind your ear. It’s important to mention that any jewelry you might be wearing should be removed prior to doing a patch test. After applying the solution, give it a few seconds to dry off completely and repeat the action twice.
- Wait 48 hours
- Give it 48 hours for the solution to react to your skin – this is the optimal amount of time for the skin to be able to develop a reaction if any. Why not wait for 24 hours, you might ask? Well, our immune systems take some time to respond to a “trigger,” and it takes 2 days for our systems to respond appropriately. It’s also important to remember not to touch, cover, or wash the treated area.
- Scan the area to check
- After the mandatory 48 hours have passed, you will get results. Check the area to see if there are any flaking, redness, itching, or other symptoms that would indicate intolerance or allergy.
On the Elbow Patch Test
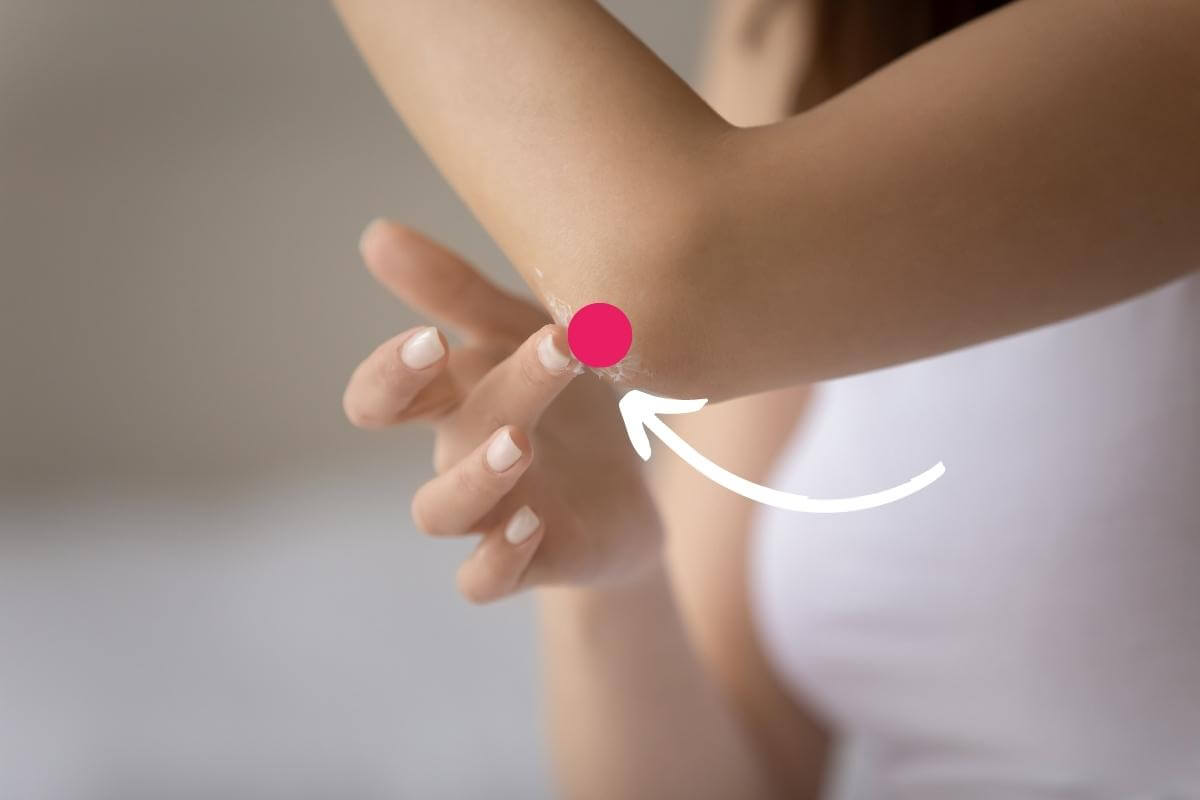
Placing some of the hair treatment product on your elbow to check for allergy breakout probability is another way to see whether a product is safe to use. The method is simple and easy to use and does not require any tools.
- Before you start, make sure the area is dry and clean.
- Apply a small amount of the product you are testing (the size of a small coin) at the crease of the elbow and cover it with a bandaid.
- Leave it as such for 48 hours, and make sure you don’t wet the area.
- Remove the bandaid and look for any regulations on your skin, like flaking, redness, itchiness, or dryness. If there are none, you can proceed with the treatment.
Have It Done at a Clinic
If you don’t feel like doing the hair patch test on your own to test the hair dye you are planning to use, you can always visit an allergy clinic. A doctor will perform an allergy test, and you’ll be able to see which ingredients you are sensitive to, so you can avoid any irritation in the future.
Why Are Patch Tests So Beneficial?
First and foremost, doing a patch test will help you understand your skin chemistry and how it interacts with different hair products. For instance, steer clear if you’re allergic to ammonia and use a hair color containing the chemical.
If you use such a product, you’ll feel an unpleasant sensation that can either be in the form of extreme itchiness, mild swelling, or even blisters. Either one can cause you serious discomfort.
A patch test will only take a minuscule fraction of your time, but it will benefit you greatly.Some of the benefits of using a patch test before you change your hair color are:
- It prevents your skin from rupturing due to chemicals;
- It allows you to react ahead of time;
- It helps you become knowledgeable about the way your epidermis responds to hair products;
- It might save you from suffering extreme allergic responses.
A Step-by-Step Guide to at-Home Hair Dye Patch Test
If you are a conscious beauty, good for you! You are probably up for trying out hair products before you immerse all of your hair in them, and that’s great! If you’re planning to dye your hair at home, follow these simple steps to ensure your hair dye product is safe to use.
Step 1: Mix the Hair Dye
To run a test on your preferred hair dye, you can mix a coin-sized amount of the dye with the activator liquid, just as you would dye your hair. You should only use a small amount of the dye, not the whole cream bottle and the activator.
The reason behind it is that if everything works out after the 48 hours, you wait for a possible reaction; if you mix up all the liquids, they won’t be any good to use after being mixed and stale for 48 hours.
Step 2: Apply the Color
After your mixture is done, use a cotton swab and dab the tip into the mixture. Choose the right spot on your skin to apply the mixture. Make sure the area you choose (the back of your ear, the elbow crease, or your neck) is dry and free of perfumes, body lotions, jewelry, and so on.
If you do have a response to the dye, any of the aforementioned areas will be easily detectable Many prefer to do the patch test on their inner arm, at the elbow crease, but again, the choice is all yours.
Step 3: Watch and Wait
After you have ensured the dye has dried in your skin, leave it as it is and give it 48 hours to work. Should you feel an itch, a rash, swelling, or redness starting to develop, you’ll know your skin is rejecting the product, and you can call it a day.
Wash off the area gently and dispose of the product altogether. Allergic reactions are nothing to toy with. If the symptoms get worse, don’t hesitate to call an ambulance. While you wait, it might be a good idea to read the information about the hair dye on the back of the box and tell the emergency doctors what you are trying to do.
Step 4: Nothing’s Happening? Colour Away!
After the 48 hours have passed and you didn’t notice anything happening to your skin, the good news is, you aren’t allergic to any of the ingredients. You are free to dye your hair any color you wish!
About the Author
 Camelia Smith
Camelia Smith can color hair, perform keratin treatments, bleach hair, and even cut curly hair. She is our go-to person whenever we have hair treatments and styling questions.
She's also currently training as a freelance makeup artist and is passionate about helping others feel beautiful in their skin. When she's not writing or doing hair, she's usually spending time watching British period dramas.